
Bitbucket is a quite popular cloud-hosted source code repository. It has a free plan which includes unlimited private Git or Mercurial repositories for up to five team members and even 50 build minutes per month. Bitbucket Pipelines is its integrated Continuous Integration tool, comparable to Travis or AppVeyor: A repository can be configured to run a certain script after each commit. For example, to check if the build passes—or to build a Docker container of your ASP.NET Core 2.0 app which is automatically pushed to Azure Container Registry (ACR), from where you can deploy your container to Azure App Services or robust Kubernetes clusters. In this blog post, I will explain how to set up Bitbucket Pipelines, build your ASP.NET Core 2.0 app (checked in to a BitBucket Git repository), package it as a Docker container and push it to your Azure Container Registry.
Step 0: Repository Setup
Make sure that you have a Git repository hosted at BitBucket. Either create a new repository there or transfer sources from an existing repository over to Bitbucket—it doesn’t matter if it’s public or private. This solution even works with the free plan and hence is helpful for both hobbyist as well as commercial projects. Fun fact: This also works with Bitbucket’s Mercurial repositories, if you’re more into that sort of thing.
Next, commit your ASP.NET Core 2.0 app into your repository and push it to Bitbucket. If you don’t have an ASP.NET Core 2.0 app ready, you can use an unmodified new ASP.NET Core 2.0 Web API project created by Visual Studio or Visual Studio for Mac.
Step 1: Set up Azure Container Registry
Azure Container Registry is a private registry for containers in different formats, Docker being only one of them. If you already have an ACR up and running, scroll down to step 2. In case you don’t have an ACR running yet, it’s super easy to create. It’s only a few Azure CLI commands (az acr) or a couple of clicks in the Azure portal (Create new service > Type “Azure Container Registry”): Enter a name, optionally create a new resource group for the ACR, choose a target location and pick an SKU that suits your needs.
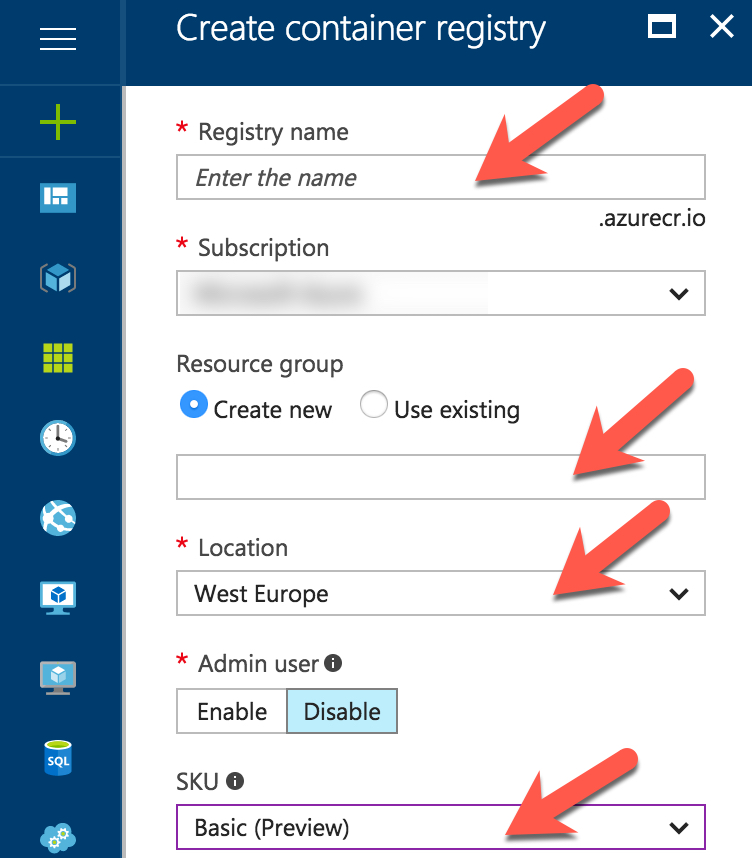
Due to its lack of support for Webhooks, the Classic SKU is not recommended. The deployment takes roughly a minute (or longer, depending on the load) and you are good to go. Please note that the ACR costs a few cents per day, but Azure has some discounts for students (Microsoft Imagine) or start-ups (Microsoft BizSpark).
Step 2: Get the Credentials
Next, we need to get the credentials for accessing the Azure Container Registry. The Admin user is disabled per default, and that’s for a good reason: Using the Admin user violates the principle of least privilege, as every connected service would have full control. Furthermore, you can’t distinguish between the services and thus can’t define granular permissions. In production, you should definitely use service principals. You can either use the CLI or the Portal. Here’s how it works for the latter:
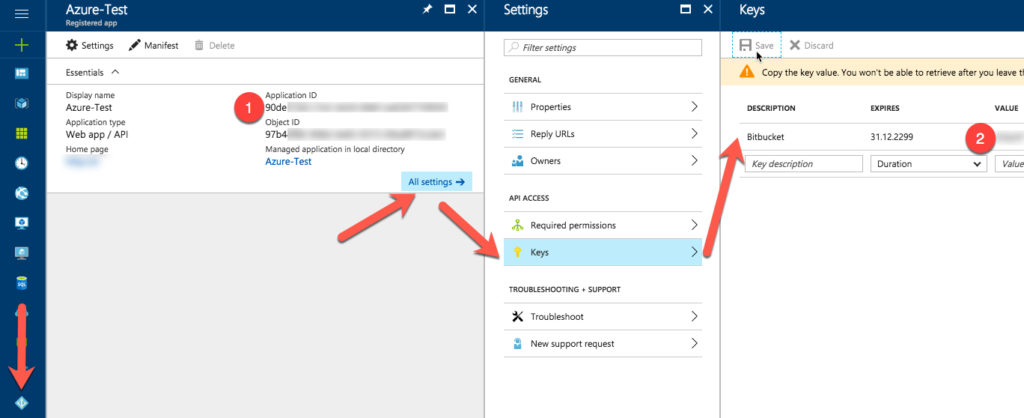
Click Azure Active Directory (leftmost arrow in the screenshot above) > App Registrations > New application registration. Choose a name for the app registration (Azure-Test in my case), pick the Web App application type and type in an arbitrary sign-on URL. Next, click Create. After the registration was created, click it in the list of registrations. Then, click All settings (follow arrows above), Keys and create a new key. I used Bitbucket as a description, and that key is configured to never expire. When you save the item, the actual key is shown to you exactly once. Copy the key/password (2) and the application ID/username (1), as we need them later.
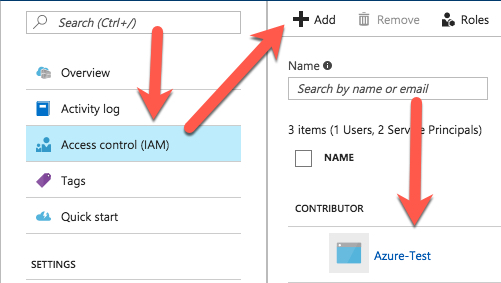
Then, switch back to your Azure Container Registry and click its Access control (IAM) menu item. Click Add, select Contributor as the role (this role is allowed to push repositories to the ACR) and enter your app registration’s name in the Select search box. Click Save, and you’re done.
Step 3: Enable Bitbucket Pipelines

Next, you need to enable Bitbucket Pipelines in your repository. This can either be done by using Bitbucket’s assistant which will create a file called bitbucket-pipelines.yml, or you can choose to create the file yourself. In the latter case, you still have to enable Bitbucket Pipelines using the web frontend. You can find Bitbucket Pipelines in the Pipelines menu entry of your repository.
Step 4: Write the Pipeline
Now it’s time for writing our pipeline. Bitbucket Pipelines are configured using YAML files which you could know from other services such as Heroku or Travis.
image: microsoft/dotnet:2.0-sdk

options:
  docker: true

pipelines:
  default:
    - step:
        script:
          - dotnet restore
          - dotnet publish -c Release -o ../release

          - export IMAGE_NAME=$ACR_SERVER/<YOUR_IMAGE_NAME>:$BITBUCKET_COMMIT

          - docker build -t $IMAGE_NAME .
          - docker login --username $ACR_USERNAME --password $ACR_PASSWORD $ACR_SERVER
          - docker push $IMAGE_NAME
In line 1, we use the microsoft/dotnet:2.0-sdk Docker image to set up a basic .NET Core 2.0 build environment. In line 4, Docker commands are enabled for this pipeline. The actual configuration is found starting from line 7. We are configuring a pipeline called default which will run a script. Here, I assume that the solution file will be placed in the root folder of the repository.
First of all (l. 10), the package dependencies of the application are restored. Next, we’ll perform a release build of our application and place it in the release folder, also at the root level. (Note: I use release as the output folder, as this folder is already ignored by the Visual Studio .gitignore template, which is a good recommendation for .NET Core or ASP.NET Core projects. If you perform those commands locally, no build artifacts would appear as untracked changes in Git.) Next, we export a new environment variable called IMAGE_NAME (l. 13). The image name consists of the server name (registry), the container name (image) and the hash of the commit (label). Bitbucket Pipelines will replace the environment variables during runtime, the only thing you have to choose is an image name that replaces <YOUR_IMAGE_NAME>.
Finally (ll. 15–18), we want to execute a Dockerfile that is in charge of packaging the build output as a Docker container using the image name explained above. We’ll have a look at the Dockerfile later. Next, we authenticate with the Azure Container Registry. If everything works, the Docker container should be pushed to the ACR. If you are done, save the Bitbucket Pipeline config. Please note that the first run won’t pass, as we haven’t configured the environment variables nor the Dockerfile yet.
Step 5: Set Environment Variables
Now that you have enabled Bitbucket Pipelines, you can set the environment variables that we already used above. Simply navigate to Settings > Environment variables.
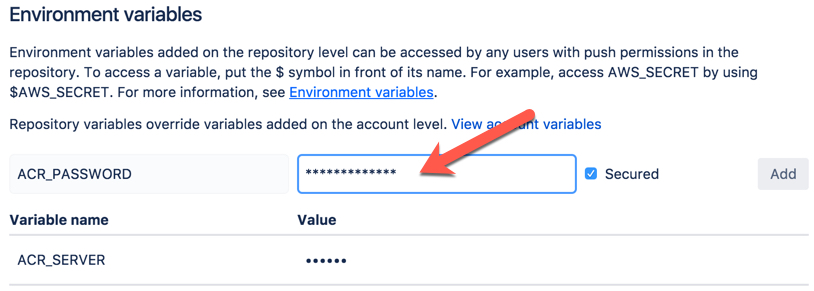
For ACR_SERVER, use the URL of your ACR, e.g. acrtest.azurecr.io. Assign the username of the service principal from above to ACR_USERNAME and its password to ACR_PASSWORD. Note that you can tick the checkbox Secured. Bitbucket Pipelines will never show you those values again, neither in the environment variables list nor in the execution log, which is recommended.
Step 6: Write the Dockerfile
Let’s now have a look at the Dockerfile. Dockerfiles can run build commands and package an application for redistribution as a container. Microsoft has a repository with Dockerfiles for .NET Core and ASP.NET Core applications on GitHub. Unfortunately, at the time of this writing, the Docker CE version driving Bitbucket Pipelines is too old for supporting the multi-stage builds that those Dockerfiles try to use. There’s an open issue at Bitbucket which might change things in the future, but in the meantime we have to use a custom Dockerfile which looks like this:
Update: The issue is now closed and the Docker version updated. Hence, you can use a Dockerfile from here.
FROM microsoft/aspnetcore:2.0
WORKDIR /app
COPY release ./
ENTRYPOINT ["dotnet", "<MyApp>.dll"]
We are using the microsoft/aspnetcore:2.0 docker image as the basis (l. 1), choose app as the working directory within that container (l. 2), copy our build output from the Release folder into it and finally configure the entry point for the container. This is the dotnet command followed by the DLL you want to run. Make sure to replace <MyApp> with your assembly name.
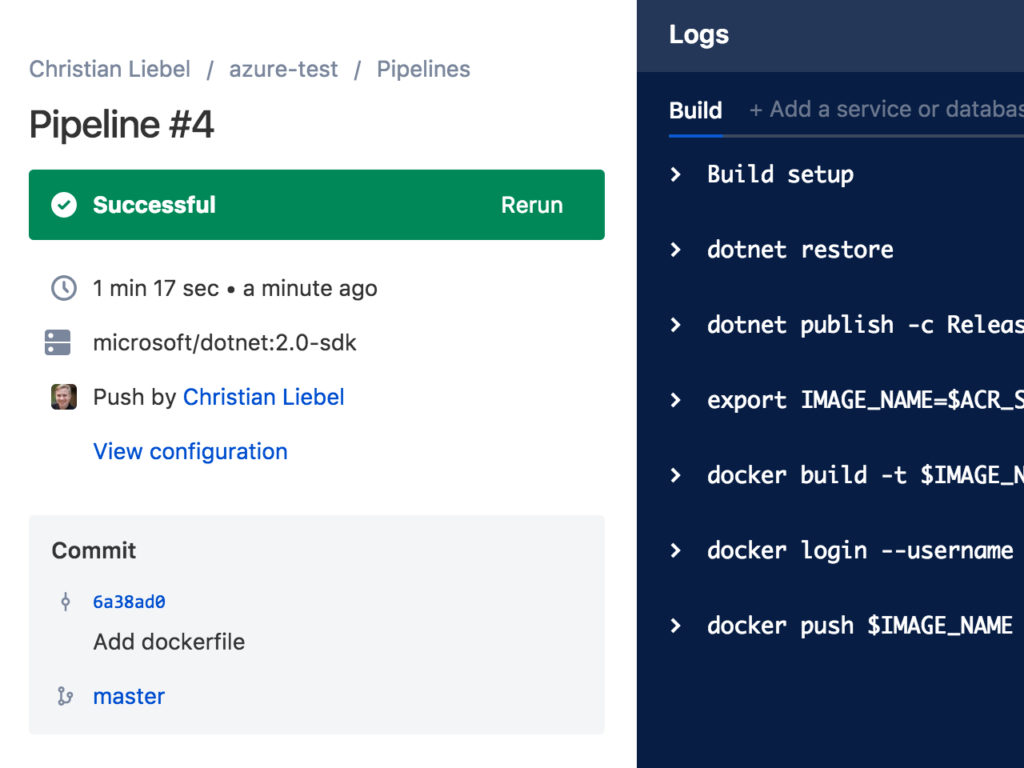
Next, commit and push your Dockerfile. Switch back to Bitbucket and check the Pipelines again. If everything was set up correctly, the build should succeed.
Step 7: Distribute
That’s it! Now you can deploy your Docker image to any target you like, for instance Azure Web Apps on Linux, an Azure Container Service and/or self-hosted Kubernetes cluster. My colleague Thorsten Hans has an excellent writing on the latter, so make sure to check it out: How to use a private Azure Container Registry with Kubernetes
Note: Currently, if you want your Docker container as a deployment source for an Azure Web App on Linux, you unfortunately have to enable the Admin user and pass its credentials to the Web App. You can enable the Admin user in the Access keys page of Web App settings. Make sure to use this Admin user only “Azure-internally”.
Conclusion
Bitbucket Pipelines are a cool feature: Combined with the power of Azure, they are extremely powerful and painless, due to the high degree of automation. Orchestrators such as Kubernetes on the other hand allow features such as auto-scaling or self-healing services that can supercharge your web application.
Note: Be careful if you’re on Bitbucket’s free plan (which includes 50 build minutes). You can only run approximately 25 builds per month, as a single build takes somewhere from one to two minutes. This might not even be sufficient for hobbyist projects. However, Bitbucket has commercial plans and allows buying additional build minutes.